Tag Archive: 3D projects

Basket and Card Share

Dline Makentakes Hi Stampers,

Before I call it a night I wanted to share the projects my Downline and I did yesterday.  Christina, Jackie and Theresa thank you for coming and looking forward to our next get together!

I will post the measurements and how to's of the cute basket we made. Super easy and FUN!  Love that combo don't you?

Thanks for stopping by and until tomorrow….

Happy Stampin',

Yvonne Metz
Vista, Ca.

Blast from the past

Good Morning Stampers! Hope your Tuesday is going well! I wanted to share a project that I shared awhile ago and I didn't realize that the link to the original person I got it from is no longer available OR that I never put the measurements for the project!  So I would like to do that now.  Which project am I talking about you ask?  Well it was and still is a very addicting one, yes I am still making them and they are just the easiest and cutest things ever!  You can see that link HERE!

Valentine Nugget Purse Holder 1It's the Nugget Purse OR Ghirardelli Purse Holder.  I did a video on the the Ghirardelli Size which you can view HERE  and the Nugget purse is put together the same way it's just different measurements.  Which I'll give you now with a few tips.

 Nugget Purse Holder:

Card-stock measures 3 x 5
Score as follows:

3" side – 1/2 in each side I did 2 1/2 turn then 2 1/2 on other side


Valentine Nugget Purse Holder 5" side – 1 1/4 and 1 3/4 this is the front of the purse so if you are using a patterned paper make sure that when scoring it looks upside down. When you fold it UP it will be the right way. Does this make sense? If not let me know I can always take photos so you can see it.

Ok, so now the tip on how to get more bang for your buck.  If you have the 6×6 Designer Series Patterned Paper that you can choose when you Host a Party you can get 2 purses out of it PLUS the wrappers for your nuggets! 

What no LEFT OVERS? LOL! Love it!

DSC00448
Here is the photo so you can see how I did this.

 Well I sure hope this is  helpful and if you have any questions please don't hesitate to ask.

 Happy Stampin',

Yvonne Metz
Vista, Ca.


Valentine Class Share

Evening all. Well today was a busy Monday lots going on. I wanted to share my projects and cards that we did for my class that I had on Saturday. Now I have already shared all the Cards, just not the 3D projects. I do have to say I think the favorite was the Lion Card.  I am showing a group shot but will share the 3D projects with more detail on each photo soon. Enjoy and thanks for stopping by.

Valentine Class
Valentine Class Projects & Cards
On top are the 3 cards that I've shared before. The 3D projects from left to right are:
Love Top Note Die box – Saw this on SCS website and they have a great Video Tutorial and it was super easy to do. The Middle is from "Stampin'  Up!s" New Petal Cone die – LOVE this die and was inspired by the On Stage presentation from Bonnie at Leadership in Nashville. Then I saw the one that my lovely Florida friend Sharon Field made, and HAD to "CASE" that Tag. You can't see it to well but you'll see it in a close up photo when I post it. It just gave it that extra "touch" and I think all the Ladies loved it too. Then the last one I cased from "Becky Roberts" she shared some super cute treat holders that she made during the Holidays for a craft fair and they were just the cutest so I new I had to make some for Valentines Day.

Questions please don't hesitate to ask. Check my events for upcoming classes

Happy  Stampin',
Yvonne Metz
Vista, Ca.


Chocolate Santa Treat Holder

Chocolate Santa Treat Holder Hello again!  I just had to share this cute and fun treat holder. I kept getting booted off the computer last night and so I gave up!  So far was able to post earlier today so all is well so far. ; )  Well I was in Target and found these Chocolate Santas, you get 3 in a box for 99 cents! Woo Hoo!  So I just had to come up with a holder for them and a video for you!  Give it a try! Would LOVE to see what you come up with! Comment me here with the link so I can see! Have fun and thanks for stopping by!

Chocolate Santa Treat Holder trio Supplies used are all Stampin' Up!

Stamp Set:  Jolly Bingo Bits, Teeny Tiny Wishes
Cardstock:  Whisper White, Real Red, and Candy Cane Christmas
Ink:  Chocolate Chip
Accessories: Scallop Circle, 1 1/4 and 1 inch circle punches, modern label and word window punch, Dazzling Diamond glitter, Sticky Strip, Ribbon, dimensionals, white gel pen.

Happy Stampin',

Yvonne Metz
Vista, Ca.


Scallop Envelope Purse

Good Morning all!  Ok, so here is another share I have for you! I have been sooo wanting to make these for the longest.  I saw these everywhere last year and am just now getting around to it. Talk about Easy??? Oh, Yes, SUPER easy!  So let me tell you how it was done. If you'd like a photo tutorial comment me.

Thanksgiving Scallop Envelope Box Supplies used are all Stampin' Up!

Stamp Set(s): Day of Gratitude #120835, Teeny Tiny Wishes #115370
Cardstock: Whisper White, Specialty DSP Autumn Spice (this is YUMMY paper)
Ink:  Old Olive, Basic Black
Accessories:  Old Olive Ribbon 5/8, Dazzling Diamond Glitter, Dimensionals, Word Window Punch, Modern Label punch, Sticky Strip, Big Shot, SU! Bigz Scallop  Envelope # 113462

Basically all you do is cut out 2 of the Envelopes, Trim the bottom about a 1/2 inch or close to that. Then place both bottom pieces together using Sticky Strip and Ta Da, you got yourself a very cute little holder.  Which I do have to say holds 2 Ghiradelli Chocolates nicely inside!   If you still need the visual please don't hesitate to ask. I totally understand!  Also, I will have another post a little later!  Thanks for stopping by!

Happy Stampin',

Yvonne Metz
Vista, Ca.

Take me out to the ball game

Baseball treats Happy Saturday!  Well today my son and I went to his Baseball team Pizza Party!  It was raining off an on here but it turned out really nice!  He had a blast!  I wanted to share the little party favors I made for the boys!  I was inspired by Holly Krautkremer, a fellow SU! Demonstrator!  I just had to make some!  I used the Pillow box die from Sizzix! LOVE my Big Shot!  I will share tomorrow the Coaches gifts!


Supplies – all Stampin' Up! unless Baseball Treats all otherwise noted
Stamp Set – Just Baseball & Itty Bitty Backgrounds (both retired)
Cardstock – Whisper White
Ink – Real Red, Night of Navy and Chocolate Chip
Accessories – Ribbon, Sizzix Pillow Box Die, Big Shot, Dazzling Diamond Glitter.

As always thanks for stopping & Happy Stampin',

Yvonne Metz
Vista, Ca.

More Thanksgiving Party Favors


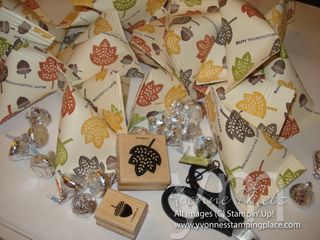
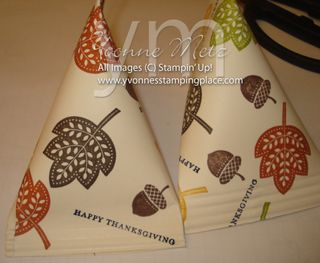
Sour cream containers bulk Happy Friday everybody!  Is it just me or did this week just fly by?  Well it sure seemed to for me, but then again I was super busy.  I wasn't feeling to well yesterday but I mentioned I was making little treat  holders for my son's class.  Well I did get them done and wanted to share those today. 

Now this project is an oldie but a goodie! Love the sourcream containers.  They are super easy to make!  If you haven't tried them you should.  Below is a quick tutorial on how to make them.  Would LOVE to see what you make.  Comment me with the link!
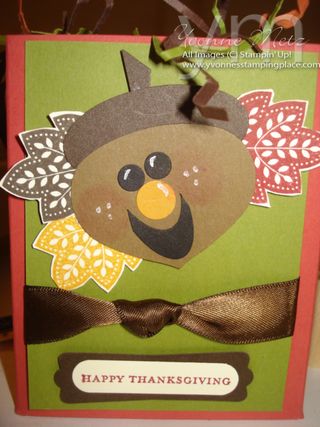
Mr Acorn box Also I made his Teacher a cute little box with "Mr. Acorn".  Is he not the cutest? 

I got this idea from a fellow Demonstrator Doris Denman.  Being a Stampin' Up! Demonstrator we have access to a site called "Stampin' Connection" and that's where I saw it!  She's has other amazing projects that I'll just have to share a little later! ; )

His face is the Ornament Punch! How clever is that???  I will share more of Mr. Acorn a little later.

Now on to the Picture Tutorial for the Sourcream Container!

Stamp set: Day of Gratitude, Teeny Tiny Wishes.
Ink used was:
Early Espresso, Old Olive, More Mustard, Crajun Craze, Chocolate Chip & Basic Black
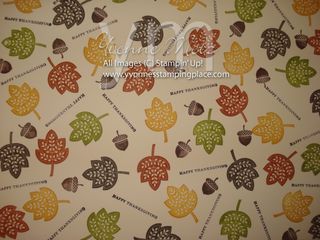
Sour Cream Step 1

Step 1

I randomly stamped a full sheet of Very Vanilla cardstock using the Leaf, the acorn and Happy Thanksgiving using the colors mentioned above.

Step 2

Cut into 4 even pieces 4 1/4 then in half at 5 1/2 you'll have 4 pieces measuring 4 1/4 x 5 1/2.
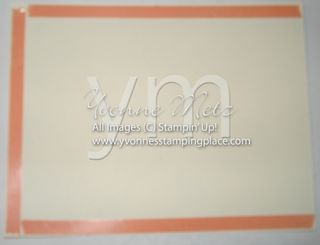
Sour cream Step 2

Step 3

Next you'll put your adhevsive as shown.
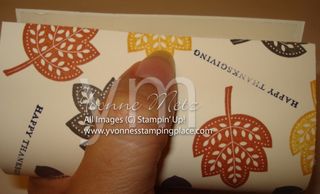
Sour cream Step 3

Step 4

You'll want to take off the sticky strip from the 4 1/4 inch side and roll like toilet paper and you'll end up with what should look like a toilet paper roll.
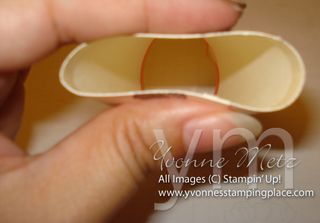
 

Sour cream Step 4
Step 5

 They you'll take the sticky strip off of one side and squeeze together like shown.
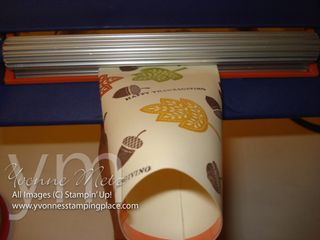


Sour cream Step 5

Step 6

Put that end into the crimper and turn about 3 times.  This will hold the sticky strip real good in place.

Before you pull off the next side of sticky strip put your goodies inside. I used Hershey's Kisses 3-4 will fit good inside.
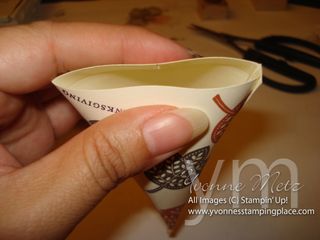

Sour cream Step 6

Step 7

Squeeze again put the opposite way. Look at the bottom of the photo.

Then run through the crimper again and you are done.  Now you can add a tag to these too! How cute would that be.  I just ran out of time.
Sour Cream projects
This will be  your finished project!  Now was that easy or what?

As always thanks for stopping by and tomorrow I'll share the party favors I made for my Son's end of the season baseball party.  TOO fun!

Have a great weekend and Happy Stampin',

Yvonne Metz
Vista, Ca.

Pumpkin Treat Holder

Got Treats Favor Hello again! So here again I wanted to share this SUPER Cute and may I day SUPER EASY Treat holder. Perfect for ANY thing you might be celebrating!  I got this idea from Patty Bennetts Blog! TONS of great stuff there too! Everything used is Stampin' Up! Surprised? ; )

Stamp Set – Got Treats
Ink – Pumpkin Pie, Basic Black
Cardstock – Pumpkin Pie, DSP Wicked Fun, Old Olive, Whisper White
Accessories: Dimensionals, Scallop Punch, 1 3/8 & 1 1/4 circle Punch and Black 5/8" grosgrain ribbon, Big Shot & Two Tags Die

As I mentioned these are super easy to make. Basically all you do is cut out 2 Tags from the Two Tags Die (#115-954) with your Big Shot. On the bottom of one of the tags add Sticky Strip and that is IT! EASY right??? I would say so, then just decorate and add your candy to the inside.

Stop by tomorrow and I'll show you a few other projects! Thank for stopping by &

Happy Stampin',
Yvonne Metz
Vista, Ca.


The Great Pumpkin

Great Pumpkin

I LOVE Charlie Brown and I also got my son to LOVE the Peanuts Gang too! 

He likes the part when they go for "Tricks or Treats" and Charlie Brown gets a rock! So this card was Inspired by that and also by all the cute Ghosts I've been seeing made with Stampin' Up!s Owl Punch! Way to fun! 

So this is what I came up with! Everything I used is Stampin' Up! As soon as my Son saw this he knew what it was from! ; )

Materials Used:

Card Stock: Rich Razzleberry, Pumpkin Pie, Whisper White, Daffodil Delight, Basic Black, Chocolate Chip, Old Olive & Wicked Fun Speciality Paper!

Accessories: Large Oval Punch, Owl Punch, Bat Punch, 1 3/4 Circle Punch, 1/4 circle punch, Ribbon – 1/2 Lace Trim Raven, Big Shot Bird punch (leave), Stampin' Dimensionals.

Halloween treat favors
Here is another quick share. My Son wanted to make treats for his class and he helped make treats for all his class mates so this is what we did! I used retired Halloween DSP from Stampin' Up! Yep, I was hoarding it! ; )

They are SUPER Easy Triangle party favors! Got the idea from Angie Juda!Super easy to make!


Halloween treat favors 1 Here is my son helping. He stamped all the images and attached them to the party favors. Inside we put 3 hersey kisses!

To Fun! Come back a little later I have another post with another quick and easy share!


Thanks for stopping by and Happy Stampin,

Yvonne Metz
Vista, Ca.

Scallop Purse Tutorial

Yes, I am still here! I am so sorry!  Let's just say that I have had LOTS going on since coming back from Convention. Spent the Summer trying to get more Organized (work in progress) and really made a dent in things. But also wanted to spend as much time with my Son before he started 1st grade and he's be in school ALL DAY long.  I think he's finally used to it! Poor thing his first week he comes home and says "Mom, when do I get to come home early?" Awe! He didn't realize that those were the new hours now. Oh, then Hubby and  I were planning our Anniversary get away, had a blast in Cambria, Ca. Very nice and quiet there.

But anyway, am now getting back to the swing of things and wanted to start the week with a video that I said I was going to make of the Scallop Purses I made for Convention.  So enjoy and if you have any questions please let me know.  Thanks for stopping by and being patient while I get my blog back up and running.

Happy Stampin,

Yvonne Metz
Vista, Ca.

error: Content is protected !!
0

Your Cart