Tutorials

Kit Kat Treat Holders

Hello all! Ok, I can't believe I didn't share this one last year when I made them!  I have made some more just to have around and because I had bunny parts laying everywhere and didn't have the heart to toss out! UGH! No way! LOL!  Plus I had some Kit Kats handy too!  I got this idea from another Demonstrator Dawn Griffith! LOVE it! Hope you do too!  Super easy to make. Questions let me know.  Hope you are enjoying your Friday! 

Kit Kat Bunnies-1 Aren't these just adorable???

Ok, now here are the punches:

Oval - Wide for body, large for outer ear, small for inside ears andf feet

Circle – 1/2 circle for cheeks, 1/4 for eyes and nose.

As mentioned these were made last year for my son's Kindergarten Class! 

Kit Kat Bunnie group I used gingham ribbon.  Ok, on to the wrapper…

It measures at 3 x 3 1/2

Score as follows:

3 1/2 in side at  3/4 , 1 1/8 turn and score the same measurements on the other side.

Easy right? Punch out your Bunny and you got yourself a super cute and Easy Treat for anyone!

Thanks for stopping by & Happy Stampin',

Yvonne Metz
Vista, Ca.


Two Tags Box Tutorial

2 Tags Basket Hi Stampers!

As promised I am sharing the Tutorial for you today of the box that I shared  yesterday. The PDF is below for you to download.

Now I found this on YouTube and I am so sorry I thought I had the link saved and don't. But if you do a search you should be able to find it.  YouTube name is thestampcamp it is an awesome and easy video to follow. If you still can't find and want it just comment me or email me is fine. 

But I do know that this was shared on a Stampin' Up!  Cruise by Lisa Curcio & Jill George.   What a cute project and Super easy too. Once you do a few they are very addicting. Just a warning! ; )  If you have trouble downloading the file please let me know.
Download Two Tags Gift Box

Thanks for stopping by and enjoy! 
Happy Stampin', 
Yvonne Metz – Vista, Ca.


Snowflake Cards

*Edited to re-add the directions – Sorry I don't know what happened they were there yesterday I promise! ; )

Hi Stampers! Well it's been raining all day today! School is out and I've been snuggling with my son all day today! Well not all day. Poor him being inside all day and his allergies are acting up. I am just hoping it doesn't turn into a cold. He started with a little coughing. UGH! I've got to watch him real good he's prone to bronchitis.  :  (

Well for today's share I got this idea from The  CardMaker Magazine November 2010. As soon as I saw it I knew I had to do this and use Stampin' Up!s Serene Snowflakes set! It was a must! LOL!  I'm giving instructions on how to do this. It is honestly super EASY!!  Enjoy and of course any questions please let me know.

Snowflake Cards

All supplies are Stampin' Up!

Stamp Set: Serene Snowflakes, Teeny Tiny Wishes
Cardstock: Whisper White, Marina Mist, Baja Breeze
Ink: White Craft, Marina Mista, Baja Breeze, Versa Mark pad
Accessories: The Big Shot, snowflake dies, White Organza ribbon, Dazzling Diamond Glitter, Scallop circle punch, Scallop Oval punch, lrge oval punch, Modern Label and Word window punch, Stampin' Dimensionals.

Step 1 -  On a 8 1/2 x 11 sheet of whisper white cardstock rub your embossing buddy all over it. Next randomly stamp your snowflakes with your Versamark ink.

Step 2 – Add your Clear embossing powder over the whole sheet, tap off excess. Next heat with your embossing heat gun.

Step 3 – Take your sponge and with the lighter blue randomly apply the ink on the cardstock leaving some areas un-inked.  Next do the same with the darker blue ink, filling in the un-inked areas and overlapping on the ink areas. The ink won't stick to the embossed snowflakes. Take a tissue paper or paper towel and wipe off any ink that gets on the Snowflakes.

Step 4 – In the book it says to cut you cardstock in 4 equal pieces. I cut mine down to 4 x 5 1/4.

Step 5 – Now you are ready to decorate as you like. Before I placed my layer of cardstock down to my card I added the ribbon first.  Enjoy!

Snowflake Card 1 Snowflake card 2

As always thanks for stopping by and Happy Stampin',

Yvonne Metz
Vista, Ca.

Sneak peek candy cane

Oh, and did I mention a Sneek peak for tomorrow?  Just a cute little party favor.


I know mean  huh?

More Thanksgiving Party Favors


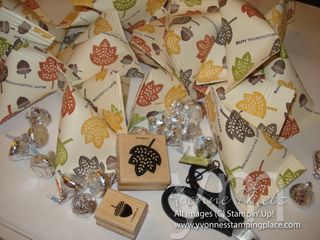
Sour cream containers bulk Happy Friday everybody!  Is it just me or did this week just fly by?  Well it sure seemed to for me, but then again I was super busy.  I wasn't feeling to well yesterday but I mentioned I was making little treat  holders for my son's class.  Well I did get them done and wanted to share those today. 

Now this project is an oldie but a goodie! Love the sourcream containers.  They are super easy to make!  If you haven't tried them you should.  Below is a quick tutorial on how to make them.  Would LOVE to see what you make.  Comment me with the link!
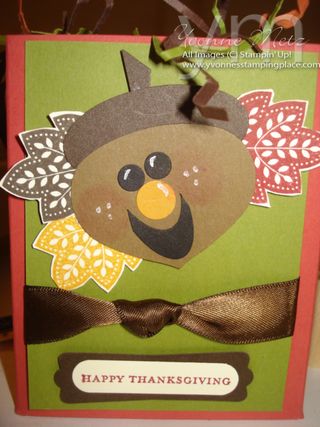
Mr Acorn box Also I made his Teacher a cute little box with "Mr. Acorn".  Is he not the cutest? 

I got this idea from a fellow Demonstrator Doris Denman.  Being a Stampin' Up! Demonstrator we have access to a site called "Stampin' Connection" and that's where I saw it!  She's has other amazing projects that I'll just have to share a little later! ; )

His face is the Ornament Punch! How clever is that???  I will share more of Mr. Acorn a little later.

Now on to the Picture Tutorial for the Sourcream Container!

Stamp set: Day of Gratitude, Teeny Tiny Wishes.
Ink used was:
Early Espresso, Old Olive, More Mustard, Crajun Craze, Chocolate Chip & Basic Black
Sour Cream Step 1

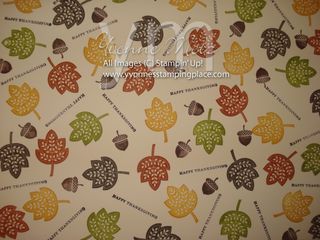
Step 1

I randomly stamped a full sheet of Very Vanilla cardstock using the Leaf, the acorn and Happy Thanksgiving using the colors mentioned above.

Step 2

Cut into 4 even pieces 4 1/4 then in half at 5 1/2 you'll have 4 pieces measuring 4 1/4 x 5 1/2.
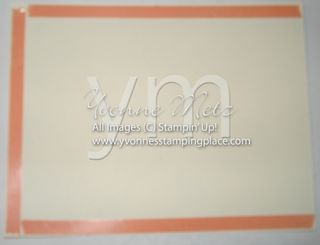
Sour cream Step 2

Step 3

Next you'll put your adhevsive as shown.
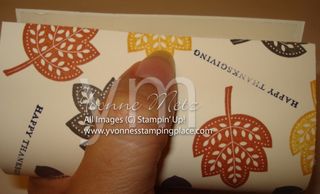
Sour cream Step 3

Step 4

You'll want to take off the sticky strip from the 4 1/4 inch side and roll like toilet paper and you'll end up with what should look like a toilet paper roll.
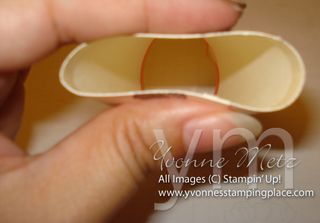
 

Sour cream Step 4
Step 5

 They you'll take the sticky strip off of one side and squeeze together like shown.
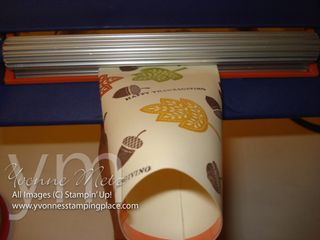


Sour cream Step 5

Step 6

Put that end into the crimper and turn about 3 times.  This will hold the sticky strip real good in place.

Before you pull off the next side of sticky strip put your goodies inside. I used Hershey's Kisses 3-4 will fit good inside.
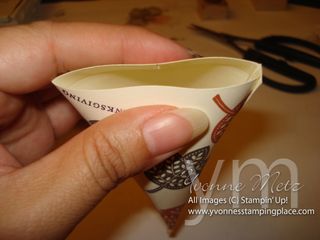

Sour cream Step 6

Step 7

Squeeze again put the opposite way. Look at the bottom of the photo.

Then run through the crimper again and you are done.  Now you can add a tag to these too! How cute would that be.  I just ran out of time.
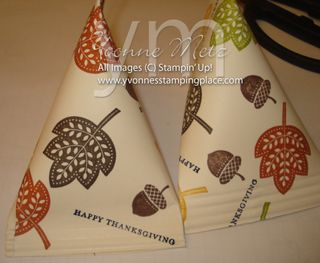
Sour Cream projects
This will be  your finished project!  Now was that easy or what?

As always thanks for stopping by and tomorrow I'll share the party favors I made for my Son's end of the season baseball party.  TOO fun!

Have a great weekend and Happy Stampin',

Yvonne Metz
Vista, Ca.

Happy Friday!!!

I am back….sorry to have been MIA once again. I had some issues with my Account which are resolved now so I'm back to blogging.  Now to update everything ;  ) in time it will be for sure. Oh and we have an addition to the family…I'll share that later. I know how mean to just keep you wondering huh? ; ) 

DSC02930 But now I'd like to start with what I had ended with.  I have a step by step tutorial for the Halloween Bag PLUS 3 different measurements so Enjoy and I'll have my video done over the weekend.

Ok, here is the newest Halloween Bag I've made…LOVE making these bags so simple and just a score here and a  cut there and you've got a super cute bag or if you make the smaller one you can close it up. Photos will show that below.  So let's start with the measurements!

Large bag which is the one I made on the post below are as follows:
10 1/2 x 11/12 – 2 pces – Score 3 sides at 2 1/4  -  Handle: If you use paper you can cut a strip of 1 x 11 1/2 (1 or 2 depends on what you like)

Medium Bag measurements are as follows:
8 1/2 x 10 – 2 pces  – Score 3 sides at 2 inches -  Handle: for the photo I used Black Grograin Ribbon with Jumbo eyelets.

Small Bag Measurements are as follows and Tutorial for these measurements below:
6 x 6 – 2 pces LOVE this size since you can get the Sampler Pack as a Hostess gift and it comes with 2 sheets. Woo Hoo! Ok, now this one I Scored 3 sides at 1 inch  -  Handle/your choice

Photo 1Click on images to see larger photo.

Step 1: 

Score both pieces.  For this 6 x 6 you'll score 3 sides at 1 inch.
fold/crease all 3 sides


    Photo 2 Photo 3   
Steps 2 & 3:Snip as shown on 1 Piece take off the Tabs completely.

Photo 4  

Step 4: Add your adhesive as shown. I LOVE  my sticky strip.

Photo 5

Photo 6 Photo 7  

Steps 5, 6, 7: Put together as shown
Tip – on step 7 which is putting the sides together make sure they line up. You may need to trim top just a tad. 

Photo 8 Photo 9 Done plus on the smaller bag you can squeeze the top as shown and close the way you like. Will show finished project of this a little later. Now just decorate as desired!

I sure hope you enjoyed and if you have any questions please let me know.  Will be working hard this weekend to get my blog updated.  More projects too!

Thanks for stopping by and have a wonderful weekend!

Yvonne Metz
Vista, Ca. 

Page Corner Book-marker Mini Tutorial

Ok, here it is as promised!  Let me know if you have any questions at all! I have to warn  you these are super addicting.  I found the pattern in our monthly Stampin' Success Magazine we get and I just adjusted the measurements just to make it that much more easier.  Enjoy!

Pgcbm-1
First you'll want to start with a 4 x 4 sheet of cardstock. Want it smaller? Just adjust the size..I also did one 3 x 3 which came out cute for your smaller paperback books.

Mark 3 sides with a little dot in the center. In this sample I marked at 2 inches.

Pgcbm-2

Now you are going to take your ruler and bone folder and make a score line from the center of to the side.

You can also use your Paper Cutter for this part too.  Just make sure you put your scoring tool in there or use you bone folder.

Pgcbm-3
Now fold down both sides and this is how your piece will look.

Now I added a piece of cardstock to cover the line in the back.

To do this I just measured the part that was just scored and for this 4 x 4 size I got 2 3/4, so cut a square 2 3/4 x 2 3/4 and cut in half.

Pgcbm-4

You will have this triangle piece and you'll then put adhesive on the back of it and place it on top of the book marker.

Make sure that if you end up with a gap where the cardstock meets, you want to make sure that you don't get any adhesive on the inside where the page will go.

Pgcbm-5
Here is what the finished piece looks like after you place the triangle part on it.

See no line! Love this cute little project. Perfect for school age kids and Great Teacher Gifts too!

Happy Stampin',

Yvonne Metz
Vista, Ca.


Graduation “Side” Step Card

Grad Side Step Card Happy Saturday All!  Well I've been busy over the last week! ; )  As I mentioned I'm getting ready for the Vista "Chocolate Festival". 

So anyways in between all that I'm making Grad Cards for my Daughter to see which one she likes..and with Graduation just around the corner.. .YIKES! I'll be up late these next few weeks.

Ok, so on with the details of this card. Super fun and once you do a few very easy to make.

Everything used is Stampin' Up! unless otherwise noted!

Stamp Set: Great Grad & (retired) Bold numbers! LOVE these numbers!
Card-stock: Bravo Burgundy, Going Gray, Whisper White
Ink: Bravo Burgundy, Going Gray & Basic Black
Accessories: SU! Punches, Big Shot Bigz Pennant Die, DD Glitter, Ribbon

I would LOVE to see your creations! Download Directions HERE!  As I mentioned before the directions I got from Kate Wilson & Jackie Topa's site!  OH – Quick Tip you want to make the Slit First…so you would have the 5 1/2 side up against your cutter and line it up to the 2…then go down to 2 1/8 start your slit and end at 7 1/2.  I hope that made sense! If not email me with any questions you may have!

Ok, on my way to a Birthday Party! 

Have a great day & Happy Stampin',

Yvonne Metz
Vista, Ca.


Stair Step Cards

Cupcake stairstep card sideview Hello all! Hope you are all had a wonderful Saturday! 

I had a GREAT Day today! I did a Demonstration at our "Udderly Awesome" Meeting today. 

I demo'd the Stair Step Card. This is such a fun card and at first looks so intimidating but it is SUPER easy.  I am so visual and I know others are too so once you SEE it then it's like OHHHH! ; ) 

Anyway, it was an awesome meeting and Ladies and other things demo'd where GREAT!

Download Stair Step Card Directions w photo

  All supplies used are Stampin' Up!

Recipe:

Stamp Set: Crazy for Cupcakes, Celebrate Everything
Card-stock: Pink Pirouette, Riding hood Red, Chocolate Chip, Whisper White
Ink: Riding-hood Red, Chocolate Chip, So Saffron
Accessories: Scallop Punch, Dazzling Diamond Glitter!

Wait til you see tomorrows card! Now go and make some Stair step cards! I would love to see your creations!

As always thanks for stopping by & Happy Stampin',

Yvonne Metz
Vista, Ca.


Bird-Day/Bella Rose Box Tutorial is now Here!

Finished Bella Box Happy Friday Night All! I just wanted to let you know that I am finally DONE!  It is officially still Friday Night here in Cali! 

I was expecting my Son to take a NAP today but of course because Mommy has something to do he didn't! UGH!  Oh, well at least he was a Good Boy and let me finish my File!  I really hope you enjoy this and if you have any quesitons please let me know.  I hope you can understand the Diagram that I tried to make.  I ahve another Super Cute Box to share tomorrow!  As I was throwing this Tea Bag box out, I was also tossing a Party Lite candle box…well you know I had to make something with that too!  I few changes here and there and I created a super cute and semi-easy box. ; 

Download Birdday_box_Tutorial.pdf

DSC01362

Ok, here are 2 of them together you can skip the Coluzzle part if you want to.  I don't know I think I like it better with the Cut out in front. My daughter and I liked it but liked the other one better.  Now maybe try another set, DSP or something. Ok, this last photo below is the close up on the tag I made. 

DSC01368 

 I love this Tag! It would be perfect on a card to! I love this NEW Set too Stampin' Up's  "Flight of the Butterfly" and of course the New Bella Rose DSP! Yummy!!!

Ok so go ahead and make some Boxes! I would love to see your creations! My box of Goodies came in today so I'll be playing all day tomorrow! It's  Mom's Day! As always Thanks for stopping by!

Happy Stampin!

Yvonne Metz
Vista, Ca.


Mini Purse/Treat Holder Tutorial

Ok, Dinner is in the oven so here is your Tutorial!  If you have an questions please let me know. 


DSC00883 Start with a 5 ½ x 8  DP of your choice
2 pcs of Dp 1 x 3 ½ for trim


 I used Cutie Pie DSP here!


DSC00884 Next score the 5 ½ side at 1 and 4 ½


Score the 8  side at 3 ½ and 4 ½


 Fold and crease all score lines.


DSC00886

Cut as shown to make your tabs


DSC00888


Put sticky strip as shown


DSC00889


Pull sticky strip off and place on outside of side w/out tape.  Pce should look like this now.  Take the other


strip of tape off and stick it in place.  Do the same for the other side.


DSC00891

Pinch as shown


DSC00892


Use your Crop a Dile and place holes as shown


Add Ribbon and Tada you are done!  Cute treat holder OR skip this part and you have a really cute Purse/Tote that will hold 3 x 3’s or chocolate! YUMMMY!


DSC00893


       DSC00894

error: Content is protected !!
0

Your Cart